Controlling the Technomad Encoder
The Techomad Encoder has a local web server built in. You can control the Technomad Encoder from anywhere on your network using a standard web browser (from your PC, PDA or web tablet). You will need these default passwords.
STEP 1 Open your web browser.
STEP 2 Type in the IP address of the Encoder in the address bar then press Enter. The IP Address is usually written on the unit (IP ending in “.2” See this note for additional information about configuring your computer to connect to a Link Kit Encoder.
As you see, the web-interface of the Encoder is organized in tabs, each of which contains different information. If you make any changes / edits on a screen, you must hit the Apply button at the bottom for those changes to take effect.
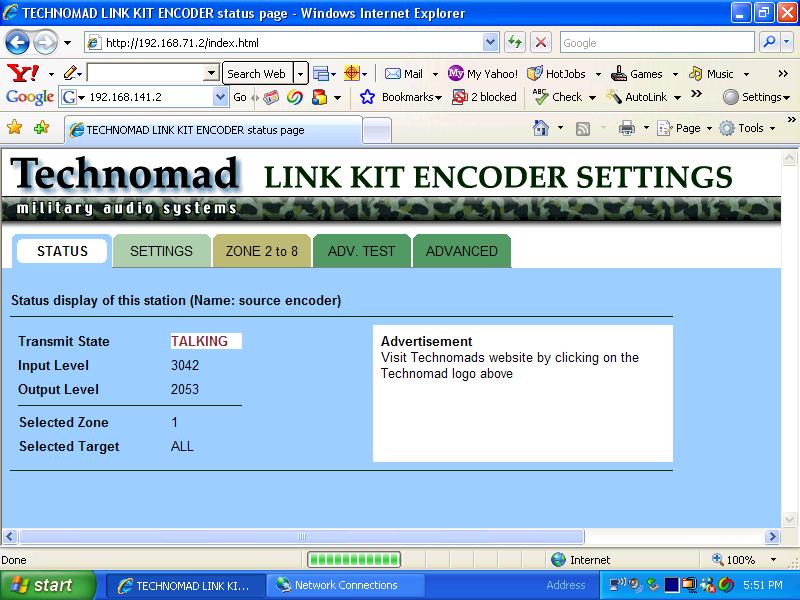
STATUS Tab
This is the first screen you see when connecting to the Encoder. This screen shows:
- transmit state
- input level
- output level
- selected zone
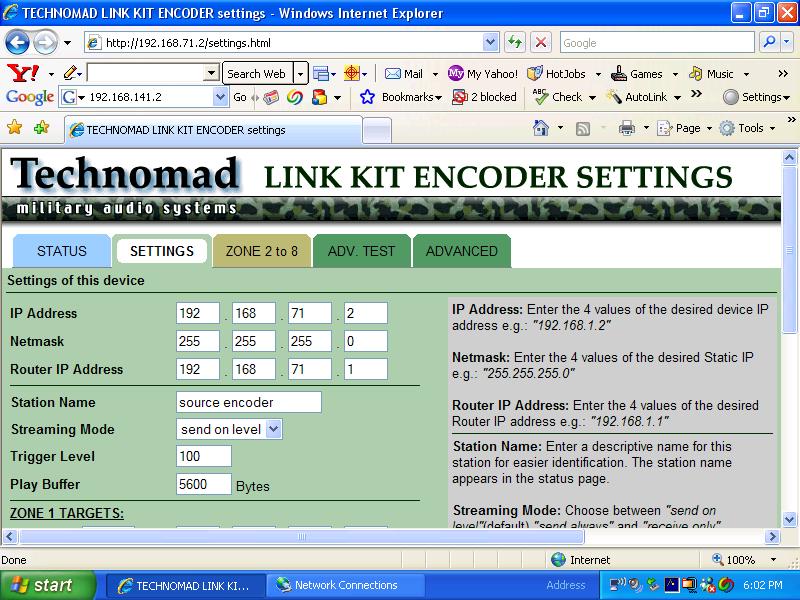
SETTINGS Tab
Default password to access this tab: “tmset” (leave username blank)
Screen shows / lets you set:
- IP address of this unit
- netmask (default: 255.255.255.0)
- router IP Address (for Technomad wireless networks, the Encoder’s router will have the same IP as the Encoder but ending in 1 instead of 2)
- Station name (you assign any text you like)
- Streaming Mode (choices: Send on level, always talking, listen only)
- Send-On-Level: will only stream to targets when input level exceeds the Trigger Level setting, see below.
- Always Talking: useful if the unit is never going to receive, but note that the device is in constant transmit state – this can generate more network traffic than necessary under certain conditions, because low-level inputs are broadcast. Send-on-Level can be used to eliminate noise – just set the trigger level to be higher than any low-level noise.
- Listen Only: useful for Encoders that are only needed to receive – i.e. Encoders installed in Output Pack PA systems.
*Trigger level – input audio signal needs to exceed this value for the Encoder to start streaming to its target list. Tip: Use the Status tab to confirm if your unit is receiving enough signals to trigger streaming.
- Play buffer – only has an effect when the Encoder is RECEIVING streams. The Encoder fills the play buffer with data, then draws from that buffer to do playback – in the meantime, the buffer is constantly being refilled over the network. If there is a network interruption, audio does not stop playing because the Encoder can keep getting data from the buffer. The buffer inserts a small delay in the audio playback – the larger the buffer the longer this delay is, but the more tolerant the audio stream will be of network problems. On the other hand, small buffer values will insert little or no audible delay, but you might hear ‘stuttering’ or gaps in the playback if there are network problems.
You will have to make an assessment in the field of the best buffer settings for your applications. Generally, wireless networks need larger play buffers than wired networks. Start with a play buffer of 5000 or 10000 for wireless networks, adjust as need-be. Wired (Ethernet) networks can operate with buffers of 500 or even less.
Tip: you can use the playback buffer to intentionally insert an audio delay in the playback at a particular PA system in order to synchronize audio between several PA systems. For example, imagine you have a Technomad Audio Source Pack streaming audio wirelessly to three Output Pack 1 PA Systems. If for any reason the audio stream is played earlier at one of the PA systems than at the others, just increase the play buffer at that PA system’s Encoder in order to put the group of 3 PAs in sync.
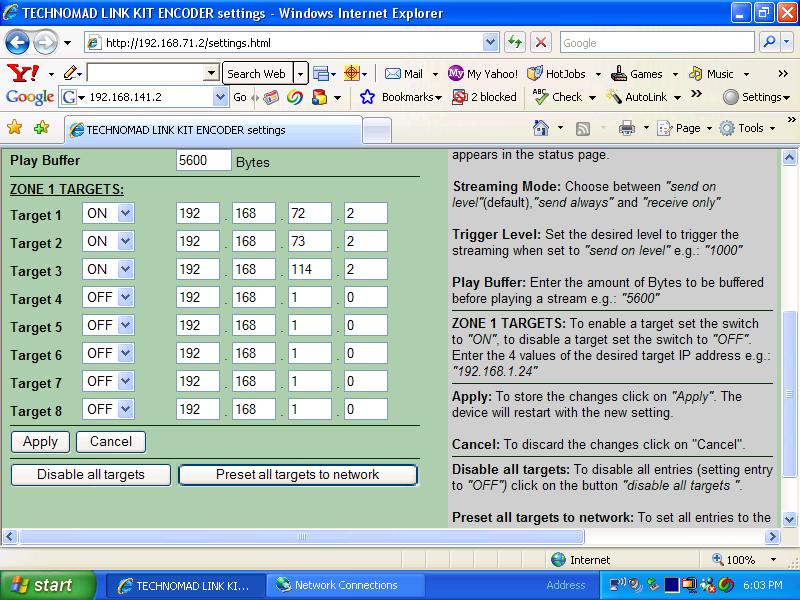
SETTINGS Tab, Part 2 – Zone 1 Targets
On the lower part of the Settings page you can set the ‘targets’ (destinations for the audio stream generated by this Encoder). Note that if the encoder you are programming is only being used to receive audio streams, you should leave these targets ‘off’ and set the Encoder to ‘Listen only’.
The 8 targets can being individually be turned on and off.
Each target is an IP address – the IP address of the target Encoder unit. Most of the time, Encoders in Wireless systems are pre-programmed by Technomad and ship with clearly labeled IP addresses on each unit. If you are configuring a wired / Ethernet-based system, you might have to get a group of assigned fixed IP addresses from your IT department, and then enter the appropriate values.
The audio stream is by default sent as UDP data on port 3030.
Disable all turns all targets to “off”.
Preset All Targets to Network sets the first three numbers of each target IP to be the same as the Encoder’s IP address.
ZONE 2-8 Tab
If you’ve purchased multi-zone option, you can configure additional zones.
Default password to access this tab: “tmzone” (leave username blank)
Each Zone is a separate target-table, which you can switch between using a Technomad-installed selector knob on the front of the Encoder. This is very handy for addressing different parts of a facility. For example, Zone 1 (the default zone you setup on the main settings page) might send audio streams to a Housing area, the Hospital, and the Command Center. Zone 2 might be configured to only send audio to the Command Center. Zone 3 might be configured to send audio to the Housing area, the Hospital, the Command Center, Guardpost 1, GuardPost 2, and the Firing Range.
Simply fill in the desired target IP addresses for each Zone, hitting ‘Apply’ before selecting a new Zone.

ADVANCED TEST Tab
TBA
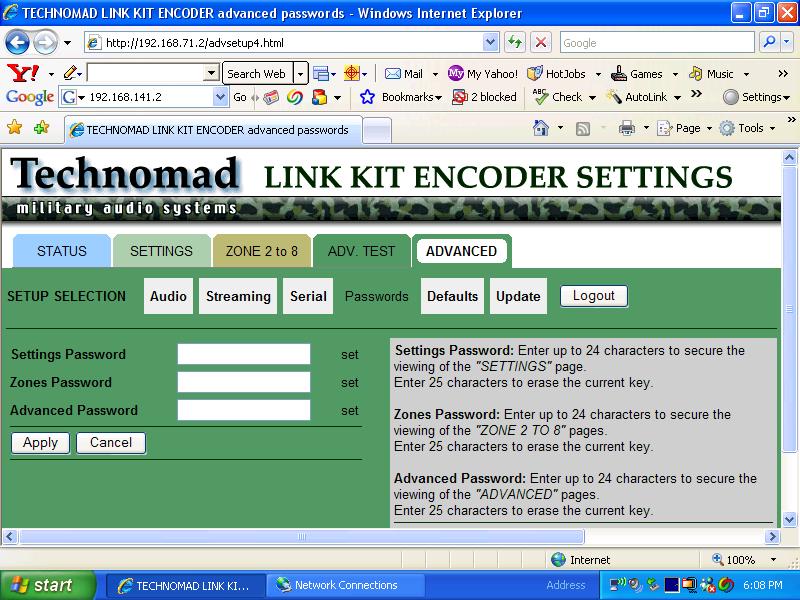
ADVANCED Tab
Default password to access this tab: “advancedset” (leave username blank)
The Advanced tab contains many trouble-shooting options for use with factory personnel. The only setting you might want to change without consulting Technomad first would be the Passwords. You can set the passwords used to access the Settings, Zones 2-8, and Advanced and Advanced Test screens.