Connecting
Here is the procedure for connecting your computer to the SuperConductor:
- Connect your computer’s ethernet port directly to the SuperConductor using a crossover cable (provided).
- Manually set your computer’s IP address to an address that is compatible with the IP address asssigned to the SuperConductor.
BY DEFAULT, the SuperConductor is set to the IP addresss 192.168.1.2
Set your computer’s network addresss to 192.168.1.200
or any address like 192.168.1.3, 192.168.1.4, 192.168.1.5, etc.
Click here for detailed instructions on how to manually set your IP address in:
Windows XP/Vista
Apple OS X
Linux
- Once you’ve connected your computer to the SuperConductor (and made the necessary network changes), you simply open a web browser (such as FireFox, Safari, Internet Explorer, etc), and type the IP address of the SuperConductor into the address bar. So, so for default ‘from the factory’ SuperConductors, you would type http://192.168.1.2 into the address bar of your brower, in the same place you might normally type http://www.economist.com.Doing this will load the Status page of the SuperConductor. From here, you can navigate to the different tabbed pages of the SuperConductor web interface, and make changes as desired. Note that the default password that protects certain pages is ‘0000’ (no username is required). YOU SHOULD CHANGE THE DEFAULT PASSWORD – it is not a secret!
Once you are done configuring the SuperConductor, restore your computer’s default network settings, disconnect the computer from the SuperConductor, and reconnect to your normal network.
It can be helpful to put the SuperConductor onto your facility’s LAN. Once the unit is on your LAN, you will be able to connect to it via the network, without having to change your computer’s network settings. Discuss this with your IT staff. Note that the SuperConductor can be assigned any fixed IP address you like (to join your network), and you can assign a default Gateway and subnet mask. This is done on the “Settings” page of the web interface, or via the LCM (making these changes directly via the SuperConductor’s knob and screen).
Windows XP Network Setup for Direct SuperConductor Connection
Note: you should write down your existing network setup information before changing your default setup. You’ll need this information when you want to restore your regular network connection. You may want to setup a special network ‘location’ for SuperConductor management, different from the setup you use to connect to the internet and your LAN.
These instructions assume you are connecting your computer directly to the SuperConductor via a crossover cable – no hub or router between the devices.
1) Go to Start and click on Control Panel.
2) Control Panel window will appear. Double click on Network Connections.
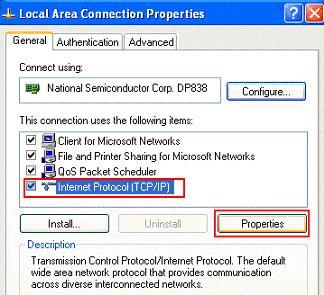
3) Network Connections window will appear. Right click correct Local Area Connection and click Properties.
4) Select Internet Protocol (TCP/IP). Click on Properties.
Manual IP Assigning
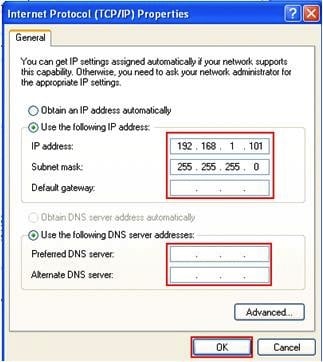
You can now type in the IP address (we suggest 192.168.1.200 for use with a default SuperConductor).
You can check what the IP address of the SuperConductor is by powering it off, then on – the screen shows the IP address.
IF THE UNIT IS SET TO A DIFFERENT ADDRESS THAN DEFAULT, just set your computer to an address that is the same, EXCEPT with a different last digit.
For example, if your SuperConductor is set to 155.27.10.10, you could set your computer to an IP address of 155.27.10.11
Set the Subnet Mask to 255.255.255.0
Leave the Default Gateway and DNS Server fields blank.
Hit OK to apply the changes.
Apple OS X Network Setup for Direct SuperConductor Connection
Note: These instructions assume you are connecting your computer directly to the SuperConductor via a crossover cable – no hub or router between the devices.
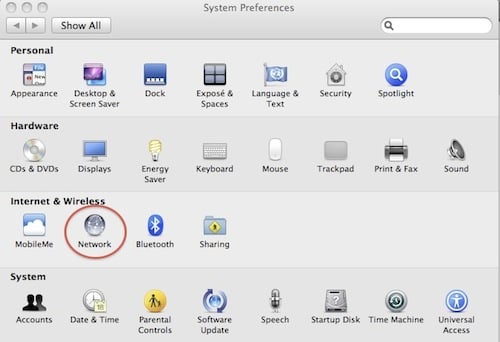
1) Go to System Preferences (in the Apple menu or in your Dock). Select Network
2) In the Network screen, take note of what your default “Location” is – you’ll want to know it’s name when you want to switch back to using your regular network connection.
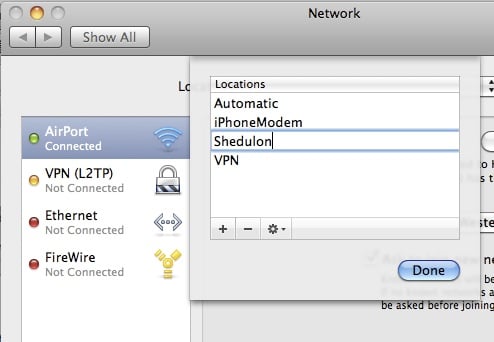
Now, click the Locations drop-down menu and choose Edit Locations from the bottom.
3) Click the + Symbol to ADD a new location – name this new location “SuperConductor”, and click Done.
4) You will now see a screen where you can set the properties for the “SuperConductor” network location.
Set the IP address to 192.168.1.200 (assuming your SuperConductor is set to the factory default IP address of 192.168.1.2).
You can check what the IP address of the SuperConductor is by powering it off, then on – the screen shows the IP address.
IF THE UNIT IS SET TO A DIFFERENT ADDRESS THAN DEFAULT, just set your computer to an address that is the same, EXCEPT with a different last digit.
For example, if your SuperConductor is set to 155.27.10.10, you could set your computer to an IP address of 155.27.10.11
Set the Subnet Mask field to 255.255.255.0
Leave the other fields blank.
Hit Apply. You should now be able to start Safari or other web browser, and enter the IP address of the SuperConductor into the address bar – the Status screen should display.
WHEN YOU ARE DONE working with the SuperConductor, disconnect the cable, and go to the Apple Menu (upper left corner of the screen, go to “Location”, and select the default Location you noted earlier.
If you want to work with the SuperConductor in the future, reconnect the crossover cable, and select the “SuperConductor” location from the Apple menu – this is a fast, convenient way to connect. You only have to create the SuperConductor location once!
Directly connect your computer to the SuperConductor via crossover Ethernet cable.
Create a fixed IP address network setup, with subnet mask 255.255.255.0 and and IP address identical to that of the SuperConductor (IP addresss is displayed on SuperConductor screen upon power-up), but with different last octet. I.e. if default SuperConductor IP is 192.168.1.1, we suggest setting your computer to IP address 192.168.1.200 or similar. Leave DNS and Gateway fields blank (unneeded).
<end>


